Containers on Amazon made easy: AWS Elastic Beanstalk Speed Run
Contents
In the previos post, I described why I chose Amazon AWS elastic Beanstalk for this blog. AWS Elastic Beanstalk (EBS) is the way to deploy Docker containers on the autoscaled Amazon Cloud with zero setup. It’s similar to App Engine Flexible Environment, but slower and harder to use. But how do you actually use it?
This post contains a speed run of setting up AWS Elastic Beanstalk. It’s easy to lose your way in AWS documentation, and I hope I can make it easy for you here.
We’re going to set up a very simple application, that has only 1 type of instances. In my case, this instance serves 1 docker image with a simple web server listening to port 80. Hopefully, when this guide becomes popular, the instace will scale up (wow!). Otherwise it will just be the cheapest thing AWS can do for some simple custom code with no disk or mutable state (aka a database).
Choose the right product (which is “Elastic Beanstalk”)
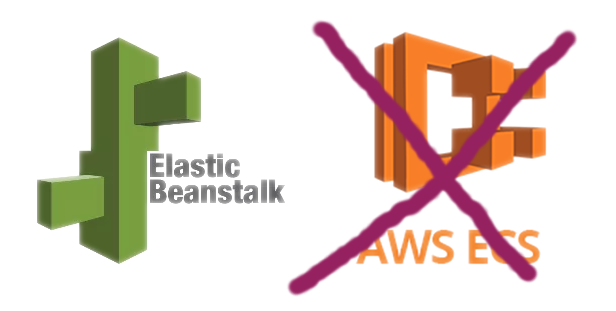
The first challenge is to not confuse it with other, less useful Amazon products. It’s harder than it seems. You do not want Amazon Elastic Container Service despite that it has the word “Container” in it, but “Elastic Beanstalk” only seems to offer beans, or stalking or both. The “Container Service” is a counterpart of EBS that requries you to set everything up manually, including your Elastic Private Network, Managed Instance Group, Elastic Load Balancer, and other Crap You Don’t Care about. On top of that, you will have to manually update Docker installations. “So uncivilized”.
Configure private Docker Registry
The next challenge is, find out a way to deploy Docker containers to your private repo. You need Amazon
Elastic Container Registry (this one both has the word “Container” and is actually useful). Create a
repo for your server image (let’s call it megaserver). Optionally (later), add a “Lifecycle Policy” that
deletes old images automatically. But for now, you need to configure the client.
Click on “View Push Commands”, which will show you something like this:
aws ecr get-login --no-include-email --region us-west-2
and it will direct you to AWS command-line client installation guide.
Create the Elastic Beanstalk app
Go to the Elastic Beanstalk, and click “Create New Application” in the top right corner. Choose some sensible name; it doesn’t matter. Then, inside the application, choose “Actions”, then “Create new environment”. Choose “Docker” as the platform.
Now, deploy your first version. Download and configure the eb app, which orchestrates deployment of
your local docker images to Elastic Beanstalk. Follow the AWS-supplied user guide–Just substitute PHP
they use as example for “Docker”. Also skip the DB if you don’t need one, like I didn’t. Run the eb init,
and follow this guide to configure Access Keys.
sudo apt-get install -y python-dev python-pip && sudo pip install awsebcli
eb init
If eb init shows some permission error, try enabling AWSElasticBeanstalkFullAccess permission.
Make sure that your ~/.aws folder did not exist before running these commands! If you were playing with
other AWS products, you might have already written something there and corrupted it somehow. So if some auth
commands don’t work, try removing the folder and then running:
rm -r ~/.aws
eb init
$(aws ecr get-login)
(The last line means “run aws ecr get-login, then run the command it printed to the console. It prints a
docker login command that would authorize docker push to put containers to the AWS registry. )
Now, your keys should be in ~/.aws/credentials. Mine looks like this:
[default]
aws_access_key_id = ASDFKGEWOFKWEOCWCEWOJ
aws_secret_access_key = BoopBoop12345/+/BlahBlahBlahfoobar
As part of the Beanstalk Command-line tool workflow, you’ll need to create ebs/Dockerrun.aws.json in
your working folder. See here for documentation. Here’s the file I created (note how it uses
the image repository name megaserver we created above).
{
  "AWSEBDockerrunVersion": "1",
  "Image": {
    "Name": "12345567890.dkr.ecr.us-west-2.amazonaws.com/megaserver",
    "Update": "true"
  },
  "Ports": [
    {
      "ContainerPort": "80"
    }
  ],
  "Volumes": [],
  "Logging": "/var/log/nginx"
}
Now, you can finally deploy your image:
docker tag boring_volhard 12345567890.dkr.ecr.us-west-2.amazonaws.com/megaserver:latest
docker push 12345567890.dkr.ecr.us-west-2.amazonaws.com/megaserver:latest
eb deploy --verbose
If all the permission are correct, your image will start deploying, and will be available within 1-2 minutes.
Update the application
When you want to deploy the next version, just repeat the same commands. You’ll see how the image is being updated on the environment page.
docker tag boring_volhard 12345567890.dkr.ecr.us-west-2.amazonaws.com/megaserver:latest
docker push 12345567890.dkr.ecr.us-west-2.amazonaws.com/megaserver:latest
eb deploy --verbose
If you set the Environment parameters correctly (I don’t remember if you need to change the defaults or not), it will perform a rolling update, where it would replace your running containers one-by-one.
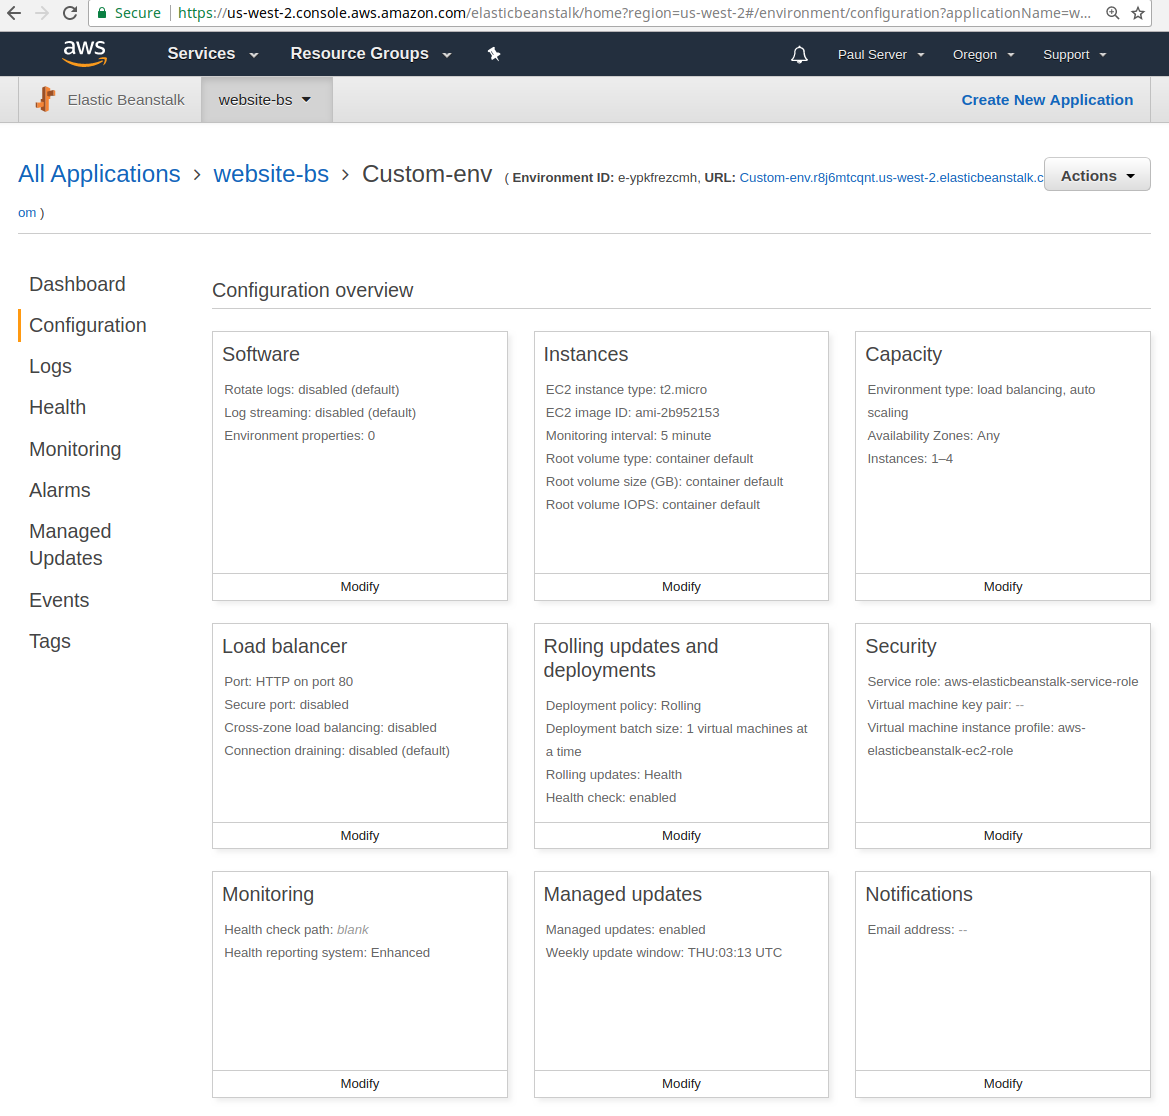
Here’s the configuration that works for me. Note the “Rolling updates and deployments” in the middle. This website can scale to more instances based on network I/O (particularly, based on the O).
Keep the change
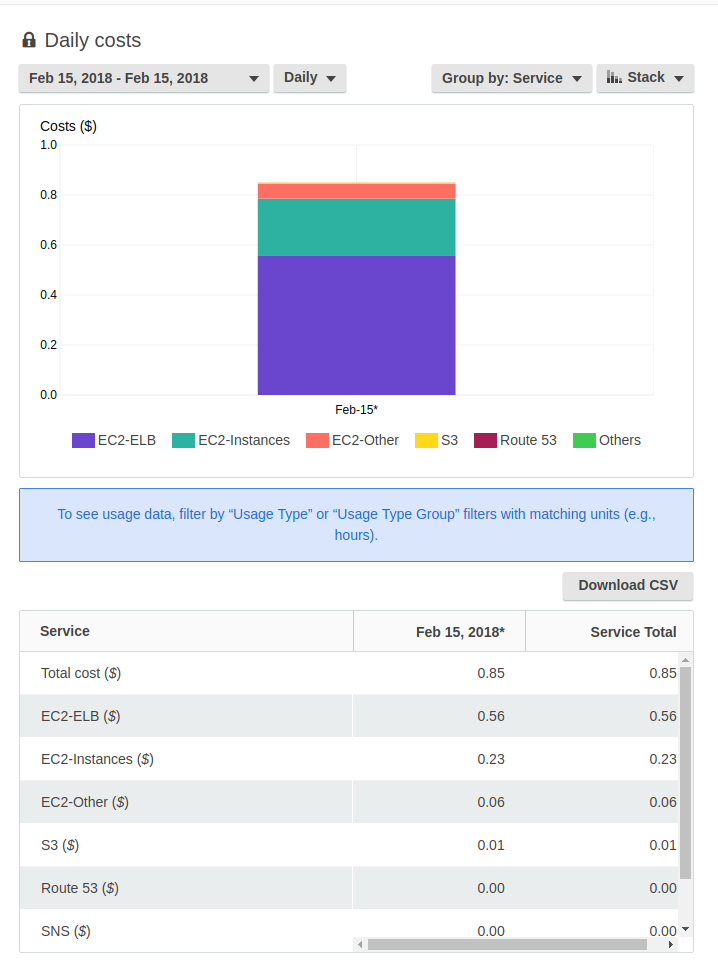
My bill for one micro instance is $0.85 per day, which brings it to… $26 a month. In a quirk of Amazon Billing, it says I’m paying the most (65%) for the Load Balancer rather than for “running the instances” (27%). Based on which, it seems to me, these costs are made up anyway. Consider this the minimum price at which one can run AWS beanstalk with dockers.
Here’s the resultant cost profile.
Overall, this setup worked for my blog. I hope it works for you as well.