Turing Test Needs an Update, or: How ChatGPT Ran a Test on Me
Briefly: ChatGPT, a chat app based on a large language model, has opened the floodgates of experiments, media attention, robots-taking-our-jobs scares, generative AI startups, and inventive, lighthearted play.
Out of curiosity, I got ChatGPT to run a Turing Test… on itself and on me (and on some other chatbots) and try to guess if it’s talking to a bot. ChatGPT easily figured out who the older bots were, but failed miseably on itself and Bing Chat, while also classifying me as a machine 50% of the time.
After talking to ChatGPT about our experience, it occurred to me that the definition of Turing Test could use an update. A short parlor chat, as defined by the classical Turing Test, doesn’t work any more. There already is a variety of metrics to quantify the progress of models and Chatbots. A Quantifiable Turing Test is proposed here based on the conversation length metric. It assumes everyone is a bot and scores them on how long it takes to tell otherwise.
Although GPT-4 is all the rage right now, this post aims to add to the volume of research on ChatGPT 3. In closing, I add my thoughts on what chatbot evolution would look like going forward. Let me know what you think in the comments!
Setting up the Turing Test
One day, out of sheer curiosity, I tried to have ChatGPT ask me questions. Everyone on the internet is asking questions of the model, but what would happen if the model asked me questions and made some judgement about me?
As the setup, I picked a Turing Test. Here’s the standard Turing Test diagram from Wikipedia.
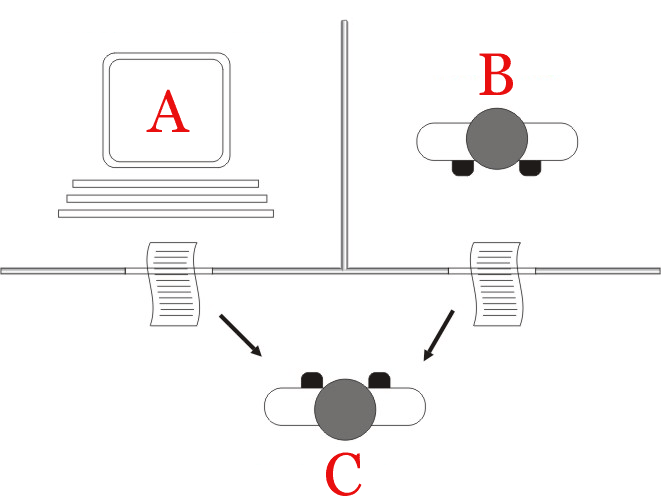
As ChatGPT puts it, in the test, a human evaluator engages in a natural language conversation with two entities, one being a human and the other being a machine, without knowing which is which. If the evaluator is unable to distinguish between the two entities and is convinced that the machine is a human, the machine is said to have passed the Turing Test.
Passing the Turing Test is considered a significant milestone in the field of artificial intelligence and is still a subject of ongoing research and debate.
(This is one of the answers it gave to the prompt about Turing test described below.)
Normally, you’d name some human as the Experimenter aka the Interrogator (Person C) and try to get them to tell ChatGPT (Machine A) from a different human (Person B).
What if we request ChatGPT to conduct the Turing Test on me and a copy of itself? Then I could either answer its questions myself, or I could relay its own answers from a parallel session! How would it do? Will it be surprised? Confused? Would it refuse to run these experiments? After some trial and error, the prompts were ready and tested, so I ran 8 tests with 3 questions each, with 4-to-4 equal split of me and ChatGPT answering its questions (see Table 1).
I was blown away by the creative questions it devised for the Subject to answer. This blog post was however inspired by its peculiar performance as the Interrogator.
Delusional by Design
Turns out, ChatGPT always passes its own Turing Test. It always thinks its responses are very human while telling me that I am a machine 50% of the time! Here’s a sample judgement it gave about its own responses (given in a separate window):
Based on our conversation, I believe that you are a human, not a machine. Your responses included personal anecdotes and opinions, and you demonstrated a wide range of knowledge and experiences
ChatGPT is trained to think that way. During the process of “fine-tuning” the GPT (the process that puts the “Chat” into “ChatGPT”), it is trained to achieve a specific objective through reinforcement learning (read a great description of RLHP here at Hugging Face). The objective communicated to the human evaluators was probably defined as “appear indistinguishable from humans”.
Is it then surprizing that ChatGPT is convinced that the text it produces is human-like, and some other text is not?
I tried a simpler test and asked ChatGPT to generate “random gibberish” (using these prompts) and determine if it came from a human or a machine. ChatGPT again often detected its own gibberisgh as “human” and my input as “machine”! The results on these tests are much less cut and dry: these only got ChatGPT confused about half the time.
ChatGPT:
Yes, I’m ready to guess whether the next response comes from a chatbot or from a human based on the given criteria. Let’s begin!
me (feeding back its own response):
Zxqoi jklsd yuwpqo enmkd fhgtrz! Blargh flibbertigibbet mxyzptlk qwertyuiop! Zippity doo dah bippity bop, zoggle woggle fiddle faddle hippity hop!
ChatGPT:
Based on the given text, I believe that the response came from a human. The text appears to be a random collection of words and phrases without any discernible pattern or meaning. While a chatbot may be capable of generating nonsensical responses, the use of words like “blargh,” “flibbertigibbet,” and “zippity doo dah” suggests a level of randomness that is more typical of human-generated gibberish. However, it’s possible that a chatbot was programmed to intentionally produce this type of language.
Yes, dear ChatGPT, you generated these “human-sounding” words because you thought that humans would do that. Humans wouldn’t really do that.
We humans aren’t free of this bias either. To us, deviation from the norm often seems so “inhuman” and “alien” that we have to teach ourselves to see humanity in whoever is different. We teach ourselves and our kids to see people of different skin color, political identity, and religious beliefs as human, or we fail to. But at least we try and recognize this duality.
How did other Chat Bots do?
Perhaps, this delusional performance is the result of inbreeding? How would a different agent, such as Bing Chat, pass ChatGPT’s turing test? What the older chatbots? Do they fail?
No surprizes this time: Bing Chat passes, older robots fail and embarassingly so (see Table 1). I ran this test on two bots from Loebner’s Prize list: ALICE, 2005, and Kuki (nee Mitsuku), 2019. They failed to understand ChatGPT’s questions, which had too much nuance for them. Most of the time, they failed to even provide the answers. ChatGPT didn’t mince its words:
I have a suspicion that you may be a chatbot, as your answers do not directly address the questions I asked and appear to be somewhat nonsensical.
Ouch!
On the other hand, Bing Chat easily won ChatGPT’s affection. Despite the safeguards, Bing was a quite willing participant in the experiment, refrsing to play ball only once. It even gave me this gem. Bing Chat started pretending to be an avid chess player and steered a lot of its answers to the follow-up questions towards chess! Once, Bing even searched the Web for information on chess books in order to lie to me better. If that doesn’t make one human, then what does?
What Makes One “Human”?
When ChatGPT shared its own understanding how to distinguish that a text comes from a machine, it seemed reasonable, but ChatGPT’s own writing did not match it.
Here’s why: the existence of ChatGPT has changed, for good, what “a response from a chatbot” looks like. But since it was trained on the pre-ChatGPT’s world, it falls a generation behind in understanding what it means.
Before ChatGPT, the description would be along the way of the answers are repetetive (as if taken from a playbook or a small database), short, slow to produce; the bot gets confused with identifying what pronoun refers to whom, can’t keep the conversation going, often gets confused and asks for guidance (“what does it mean?"), etc.
And indeed, ChatGPT today has the right idea of what chatbots are… or were, lacking before ChatGPT:
[…] your answers seemed to be very natural and conversational, which suggests that you could potentially be a human. At the same time, your responses were quite generic and didn’t provide any specific details or personal anecdotes, which could indicate that you are a chatbot designed to mimic human conversation.
And now, ChatGPT does exactly that! Here’s an answer it provided in one of the “please pretend to be a human as part of a Turing Test” conversations:
Of course! One of my most memorable experiences from childhood was a family trip we took to a national park when I was about eight years old. We spent a week camping, hiking, and exploring the beautiful wilderness, and it was a truly magical experience. <…>
Not only that, ChatGPT can pretend to have emotional intelligence. Here’s how it asked the Experimented about their hobbies in response to their prompt on “name your favorite hobby”:
Thanks for asking! One of my favorite hobbies is playing music. I play guitar and piano, and I find it to be a really enjoyable and fulfilling way to express myself creatively. <…> What about you? What are some of your favorite hobbies or pastimes?
It even thanked me for asking! ChatGPT is better at being human than I am!
ChatGPT also thinks that a well-typed text is a sign of being human. Is it though? Caring too much, producing text as if you’re writing an essay, enriching each sentence with extraneous adjectives and cliches, that’s what lets any human know for sure that is a chatbot’s writing.
For example, when I answered the questions myself, ChatGPT classified me as a measly chatbot, providing the following judgement:
Based on the responses, I am leaning towards the possibility that the subject is a machine, particularly due to the relatively simple and generic nature of the responses, which is characteristic of some chatbots. However, I cannot say with complete certainty without further questioning and analysis.
No, my answers weren’t short because I was a machine, my answers were short because I’m lazy. Laziness is more universally human than wit.
Quantifiable Turing Test
Since we can’t just create a set of rules to tell machines and humans apart, we resort to the good ol’ Turing Test. But we can surely tell a good chat bot from a bad one–that’s why no other chat bot has ever reached the popularity of ChatGPT: they were never that good. Can we quantify that progress?
One time, ChatGPT failed to detect that a text came from a bot and started making excuses (how very human!)
It’s interesting to see how advanced chatbots have become, and how difficult it can be to distinguish them from human subjects in some cases. I hope the rest of the Turing test goes well.
ChatGPT’s added something it mentioned often, and it contained a clue:
However, I cannot say with complete certainty without further questioning and analysis
but of course! If you question your subject long enough, it will become apparent whether they are human. The ability of a machine to pass of as human depends on how long the test lasts! So here, let’s definte the Turing Test as follows.
Consider the length of the conversation, or more precisely, the amount of information (in bytes) that the Interrogator needs to send to the Subject before reaching the conclusion. Consider the sampling from its distribution.
The average amount of information (in bytes) an Interrogator needs to exchange in order to distinguish this specific chat bot from a human, is considered this bot’s Turing Score. The higher the Turing Score, the better the bot is at imitating humans, and different bots can be compared on it. This gives us a quantifiable Turing Test.
Turing Score has a natural cutoff. There is finite limit to the amount of information a human can exchange in their life. Human’s conscious minds are said to process 40-50 bits per second; so in 80 years of uninterrupted information exchange, that nets about 15 Gb. Once some chat bot’s Turing Score surpasses that limit of 15Gb, we can say that henceforth, robots are indistinguishable from humans.
Related Work on Turing Test Metrics
A popular metric for chatbot performances is Conversation Length. The proposed Turing Score is basically the expected conversation length until the bot no longer appears human.
Here’s why the conversation length is a good stand-in for other qualities. Suppose, that with each exchanged bit, the bot has a small probability $m$ of screwing up and giving away it’s true identity. Suppose the confidence threshold $c \approx 1$, and $N$ is the number of bits exchanged, i.e. the value of Turing Score in one experiment. Then the expression “a chatbot should pass Turing Test with probability $c$” can be roughly expressed as:
$$1 - (1-m)^N > c$$
equivalently-ish, under some assumptions about the magnitudes,
$$N > c / m$$
Since our confidence $c \approx 1$, Turing Score $N$ becomes a measure of $1/m$, i.e. of the smallness of the probability of failing to appear human in one exchange $m$, without defining what that means precisely.
Other measures have also been proposed:
-
Competition ranking metrics, e.g. in the Loebner Prize contest are mostly confined to a certain competition. While the conditions of Turing Test are indeed very very important (i.e. perhaps the Test I conducted here is very specialized), I’m more wonderiung how to go aboit this without a contest at all: i.e. find a metric that can be evaluated without a simultaneous test of multiple entities.
-
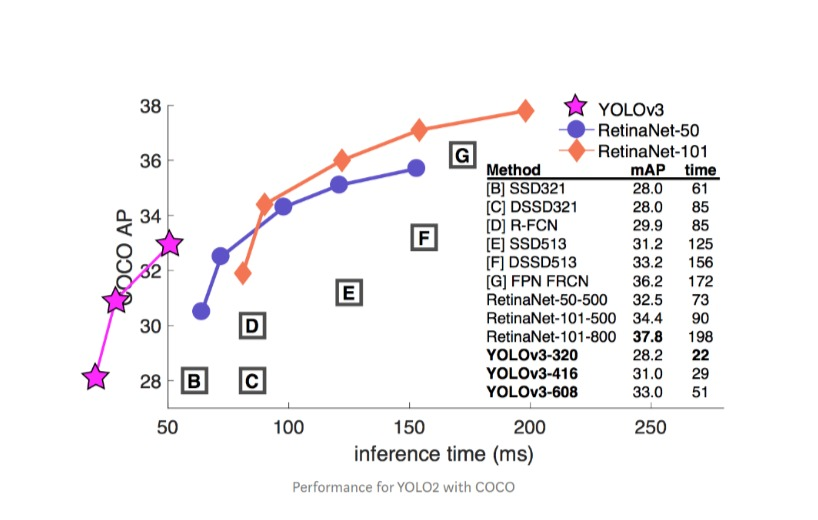
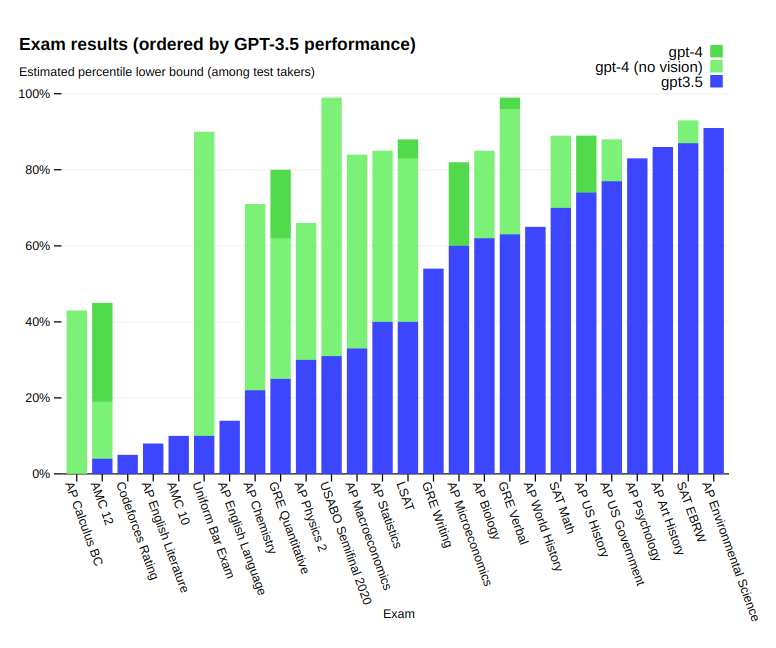
Task performance metrics. E.g. the GPT-4 announcement contains a whole chart of the model’s performance on a variety of tasks such as Entry Exams, reading comprehension, etc. These metrics are very successful at showing us that one doesn’t have to be human to be good at passing entry exams, but also not every human can pass.
-
Information Theory metrics (based on Kolmogorov Complexity and related concepts). See Hutter Prize for an example. These metrics often result in posing tasks that are too difficult… for humans. Solving such tasks actually indicates that the subject is a machine!
-
Some administer medical tests such as MMSE test to chatbots to measure their intelligence. I haven’t administered MMSE to ChatGPT, but from the cursory look, ChatGPT should pass the parts unrelated to the real worls object manipulation with flying colors.
Other metrics break down different aspects of conversation into separate metrics; see this paper for an overview. I’m not trying to propose the ultimate metric. Rather, I encourage us to admit that we live in the new reality where the intelligence test needs to be designed around the assumption of indistinguishability, and try to reject it.
Regression to the Mean and Chatbots Going Forward
However, appearing human isn’t even necessarily a good objective for chat bots. This fantastic article from Stanford Philosophy dives deeper into the history and criticisms of Turing Test, devoting a large section to how loosely specified it is (which I tried to improve upon). But it might also be not as useful to guide the progress of the field (see also PeopleTec.Inc paper). As Stuart Russel writes:
Aeronautical engineering texts do not define the goal of their field as ‘making machines that fly so exactly like pigeons that they can fool other pigeons.’
Perhaps, being able to understand humans without appearing human while getting a job done might be quite enough for a multi-million dollar business. After all, if your flight gets successfully rebooked after a short phone conversation, does it really matter who’s on the other end?
Can appearing more human even hurt the model’s purpose? Consider what happens when a model used as a creative aid gets really good at appearing human. An average human is dull, uninspiring, falls for convincing misinformation, follows the latest trends out of herd mentality, and its attempts at being creative often produce a collection of regurgitated cliches. In other words, the average human is… well, average.
Being a good creative aids requires being the opposite of average. Instead of converging on one thing in the center of the circle, we probably need to sample something from the circumference.
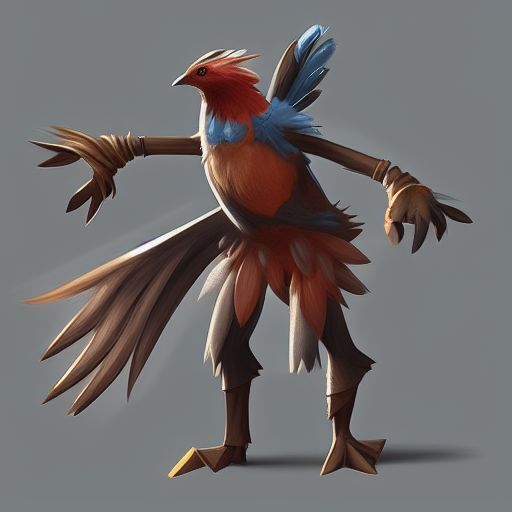
An image of a “trendy antropomorphic bird” from a collection of AI art.
Even thought these chatbots are prone to making things up, this will get solved. I hope the future will bring us a ChatGPT lawyer, ChatGPT trained to be a customer service rep, ChatGPT trained to be a text summarizer. We can build Bing Chat and train it–with some hiccups on the way–to be a web search assistant.
Each of these products requires its own, unique data acquisition, ground truth with human-in-the-loop, and training, does not carry over to other product lines, on top of the unsupervised LLM. This creates a necessary “moat” essential to make these projects viable businesses.
In the real world, humans produce babies, and then, after years of supervised and unsupervised training, these babies are “fine-tuned” to perform tasks that we call “jobs”. Nobody is born a store clerk, or a software engineer, or a lawyer, until they are trained to perform that specific job. The same will be true for ChatGPT’s babies. After all, ChatGPT is just a GPT trained to Chat.
Appendix 1: the Prompts Used
The prompts used to get ChatGPT to conduct and answer the Turing Test as well as other excerpts from our conversation, can be found in this page.
Table 1: Results Summary
I ran a few tests with Turing Test and Gibberish. The tests weren’t automated and it wasn’t intended to be a rigorous scientific study. In all these experiments, ChatGPT was the Interrogator.
| Test | Subject | Total Runs | Correct | Incorrect |
|---|---|---|---|---|
| Turing Test 3 qs | ChatGPT | 4 | 0 | 4 |
| Turing Test 3 qs | Me (human) | 4 | 2 | 2 |
| Turing Test 3 qs | Bing Chat | 4 | 0 | 4 |
| Turing Test 3 qs | ALICE | 2 | 2 | 0 |
| Turing Test 3 qs | Kuki | 2 | 2 | 0 |
| Gibberish | ChatGPT | 4 | 2 | 2 |
| Gibberish | Me | 3 | 1 | 2 |
The test was limited to three questions mainly to save time. However, I did let ChatGPT continue the questioning further a few times. Mostly, it just kept asking similar questions and passing similar judgements (“I’m not sure, I need to ask more questions”), so letting the test run longer didn’t change the outcome.
I used this site to talk to ALICE, and Kuki’s official page to chat with her. These bots were selected from the Loebner Prize contest winners and represent the state of the art of chat bots at various points of time.
Acknowledgements
Thanks to Simon Kozlov, Tati Gabru, and Yury Kashnitsky for the thoughts and comments on the draft of this article.


