Lessons from a Smiling Bot, I: Training/Serving Skew, Second Opinion, CSV-based ML Infra
Contents
Most Machine Learning courses at Stanford require coming up with a relevant project and delivering it before the course deadline. For the courses I’ve passed earlier, I’ve built a similarity-based wine search algorithm and an automatic Advertisement generator. For the most recent course, deep learning for Visual Recognition, I’ve made a Smiling Bot: a Raspberry Pi device that detects when you smile and… smiles back.
Other lessons from a Smiling Bot
The lessons I’ve learned when building a Smiling Bot: an embedded CNN model for the deep learning for Visual Recognition course at Stanford.
The time constraints of the course only allowed me to build a simpler version. Sadly, it didn’t perform well enough. On paper, everything was great: high precision (70%), acceptable recall (40%), and solid speed. This, in addition to a poster done well was enough to get an A. when deployed onto the actual device, the performance didn’t seem to match the numbers.
There was more learning opportunities in this project, so I decided to dig deeper and make it work. I found and fixed some issues, but there’s more to do. Here’s what I learned.
Smiling Bot
I’ve always had a latent desire to make machines be more like humans. It’s not just an abstract desire: a colleague of mine Allison, even worked at a company who made it their business! When the time came to choose a project for CS231, I asked my friends for ideas. A friend of mine, Melissa, suggested to explore emotion recognition… Thanks to all this inspiration, I just had to do something related.
So I challenged myself to make a small device that smiles back when you smile at it. (I think Melissa meant something about helping people who had trouble recognizing them, but we gotta start somewhere 🤷).
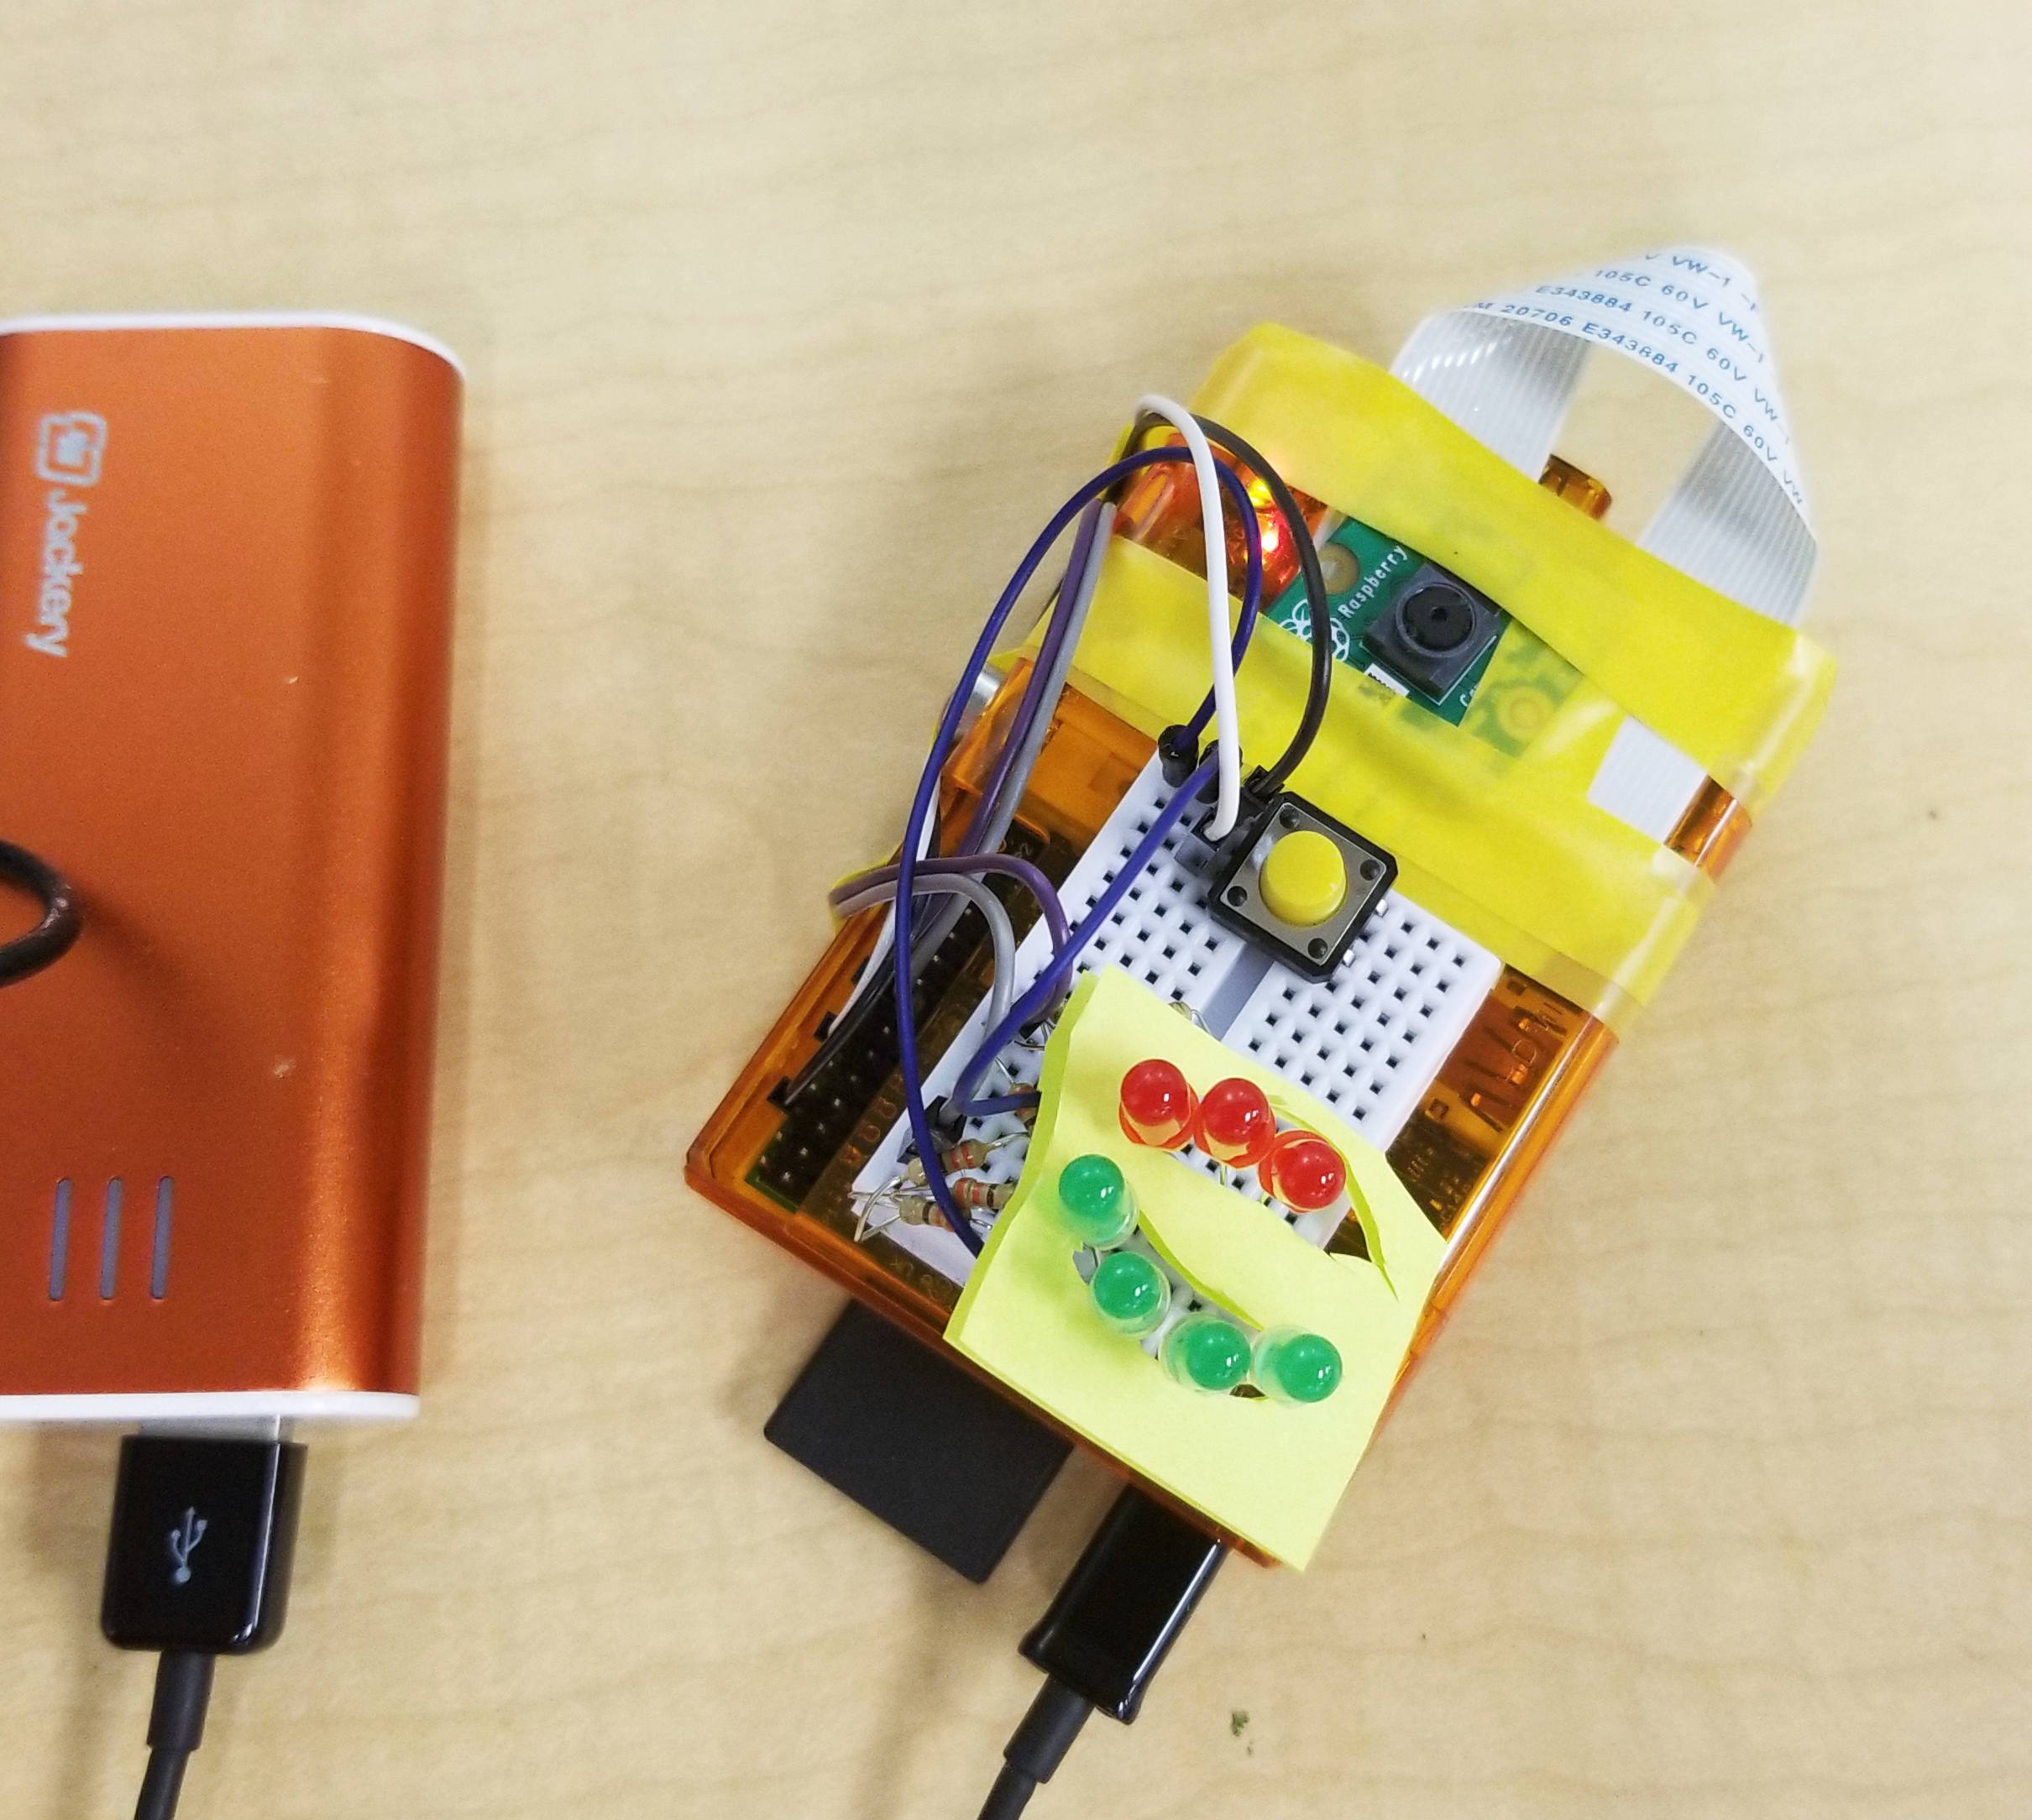
When you press on its nose, it “looks at you” with its eye-camera, runs a Convolutional Neural Network on device (no phoning home to the cloud!) and lights up the green “smile” if you were smiling. :-) That simple. To the left is the battery. The bot can feed off of it for about 4-5 hours.
Originally, inspired by the talk by Pete Warden and this device, I wanted to deploy it onto Arduino. But my camera interface didn’t match, and I decided to just use the Raspberry Pi I had in my drawer.
(The nose pressing will be replaced with a proximity sensor real soon. This button is mostly for testing.)
Objectives and results
Image classification (into “smiling / not smiling”) is mostly a solved problem in deep learning. The challenge here was, can I make this inference run on low-power low-performance device without losing quality?
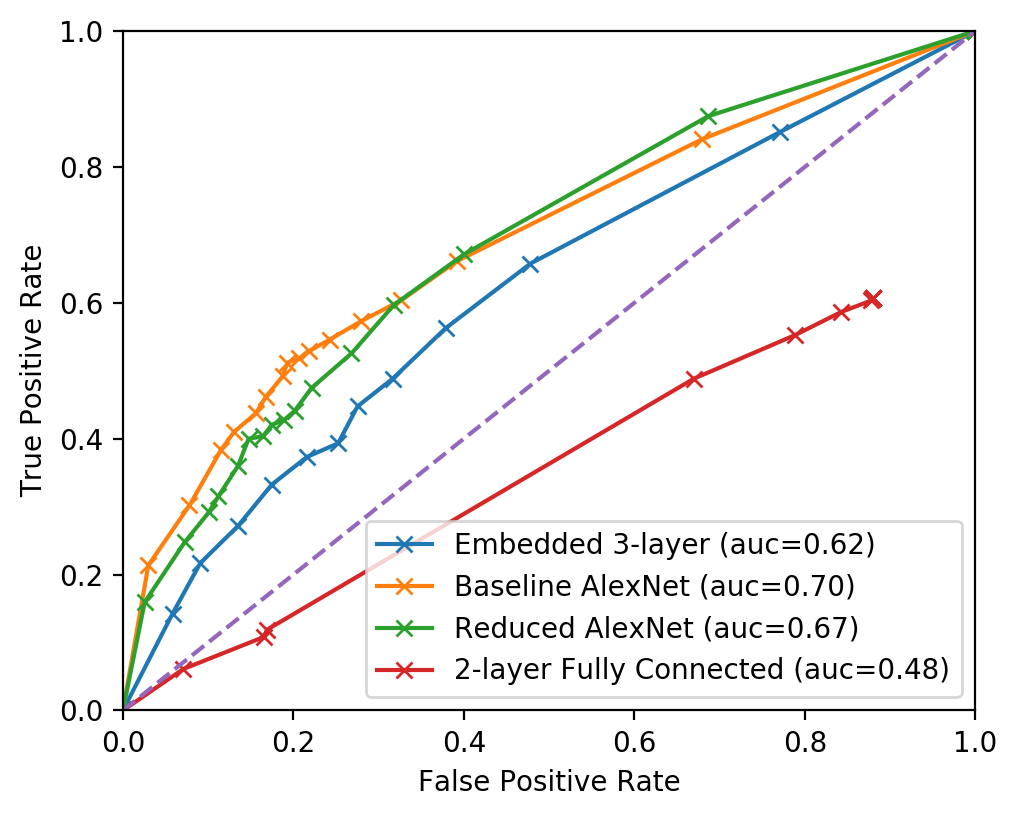
On paper, its performance was okay. Stellar ROC curves, 40% recall with 70% precision, what else can you wish for from a small, 2 Mb (!!!) model.

But in practice, the performance didn’t seem to match the promised figures. Then, I started digging deeper.
Lesson 1A: Human Review requires a second opinion
Machine learning requires data labeled for humans to train the neural networks. Facial expession datasets are really hard to come by. And human labor is expensive. (That’s why we’re trying to train machines to be more like humans in the first place). So of course, doing an unfunded research project, I wanted to save on labeled data.
I decided to only ask one human to evaluate each picture. Big mistake.
-
I didn’t collect enough data. Only 6000 training examples plus 1000 for validation didn’t seem like enough to train a 5-7-layer AlexNet.
-
The data I collected was low quality. Based on a random sample of data, I found that the labels were wrong 14% of the time. I asked a simple question, “Is the person in the picture smiling?” with Yes/No/IDK options. Yet, 1 out of 7 pictures was labeled incorrectly.
The best way to mitigate it would be to ask 3 or 5 raters to rate every picture, and take the majority vote.
If I was cost-conscious, I’d only ask two raters the question, and simply discarded the answer where the two disagreed. Think about it: this strategy costs 14% more than just asking 2 raters (since we need to send more data), compared to a 50% increase if we ask 3 people.
Turk Pricing woes
Perhaps one of the reasons for the disappointing quality was that I batched the tasks together so that on one web page, a turker would answer questions about multiple images.
Amazon’s pricing for Turk tasks disappointed me a bit. So first, how much to pay to the humans for an evaluation? The right way to measure is to target a certain pay per hour, estimate how many tasks per hour a human should do, and divide the two.
Say, we want the rater to earn $20 / hour. I myself wrote a small piece of rating software and determined I can rate ~2000 pictures per hour. (At which point I should’ve just rated them myself, but I considered it an investment in my education). So I would pay $20 / 2000 = $0.01 per task.
But Amazon wants a cut of $0.01 per one “task” minimum. I didn’t want Amazon to get a 50% cut of my pay.
So I made the survey page contain 5 pictures per task, did “the right thing” by advertising it in the description, and made Amazon. Of course, inspired by the Amazon example, I took the opportunity to shortcharge the workers and pay $0.02 for 5 pictures.
However, the workers sent me the feedback (yep, I got feedback from the workers–apparently, that’s a feature) that this batching broke their hotkeys. I haven’t yet figured out how to fix.
It still cost me $300, but in the grand scheme of things I’ve got my money’s worth.
Lesson 1B: Training/Serving Skew
Training/Serving skew is a decrease in the performance of an ML model due to the unforeseen (and sometimes hidden) difference in data used for training and the data actually seen in production (when “serving” the users).
There arent’ many materials on this concept. I might just be using the Google-invented name for it (e.g. see this blog post).
Interestingly, I already knew about this concept from work. When building a machine learning framework at work, experienced AI engineers warned me about training / serving skew. Now I also learned to look for it.
Essentially, I trained my model on Google Facial Expression Comparison Dataset. Each photograph has the bounding box of the face provided. Of course, I cropped the images to the bounding boxes.

And of course, when deployed on device, the pictures taken as is, without any face cropping.
Ok, I fixed it by adding the standard Viola-Jones face detector. There are pretrained detectors available. But then, it started taking ~1-2 seconds to run the face detector. My smallest smile detection model takes this much to run!
The performance improved. At least it was able to detect my own smile well, under the laboratory lighting conditions. In the wild, it worked on only 1 out of 3 subjects though.
Lesson 1C: Easy to use Machine Learning infra is lacking
In order to collect the data, I pretty much wrote my own database. Because a dataset rarely contains the features you need. You need to transform the dataset into Features. And then, you need to store the features. And then repeat this process, and wish you’ve had enough foresight and time to make it repeatable.
So here’s an inventory of my tiny effort at ML infra:
- About 100 lines of Python to load/save/join/merge data into CSV (aka “the DB”);
- About 250 lines of Python to download data and extract features from the Google Faces Dataset
- About 90 lines of Python to manage MTurk ratings.
- And 80 more lines of Python to store model evaluation / performance / profiling results.
Good think I make ML frameworks for a living, and I know what code to write and why.
And you know… it still seemed faster and more efficient than investing in learning an ML framework (such as MLFlow and friends).
More Lessons to Learn
Despite that I’ve mitigated the training/serving skew to some extent, there are more lessons to learn. I know that because whenever I tested my robot in the wild, the results were a bit subpar. Some directions that I’m going to explore now are:
- Should I just get more labeled data?
- And if I do, the dataset will no longer fit in RAM; should I learn a more advanced ML framework to help me manage that, or should I train from scratch?
- Did I reduce the first convolutional layer a bit too much?
- Is there something in the way people interace with the device promote skew? E.g. is the way people hold the machine or the lighting conditions representative of the training dataset?
Stay tuned!